Pi Calculator Tutorial
This tutorial aims to help you create an application that performs its work on the OneCompute Platform. It consists of a client console application that will create and submit a job to the platform and a server side worker component that will perform both map and reduce calculation tasks.
Prerequisites
In order to follow along interactively with this tutorial there are a couple of prerequisites.
This tutorial involves preparing an application for the OneCompute Platform. It makes use of OneCompute NuGet packages which are deployed in the private ADO feed. In order to follow along interactively you will need access to this feed. You can read instructions on how to do so here.
Part of the tutorial involves deploying an application to the OneCompute Portal. In order to participate you will need to have an active registration on one of the OneCompute Platform environments and have the Application Owner role.
Finally, in order to use the OneCompute Platform API client library you need to supply it with a client Id (representing your console client - the app we are going to write) & a resource Id that represents the specific OneCompute Platform API environment you are targeting. This is used for the Veracity authentication handshake. Please contact the OneCompute team and they can supply you with the necessary values for use with your chosen OneCompute Platform environment.
These prerequisites are only necessary if you want to follow along and code up the Pi Calculator application and deploy it. The tutorial is hopefully useful as a simple reading exercise as well.
The Problem
For some reason we decide that we want to calculate 𝝅 - the hard way!
The approach we will use is by:
- Inscribing a circle within a square
- Throw pebbles into the square at random
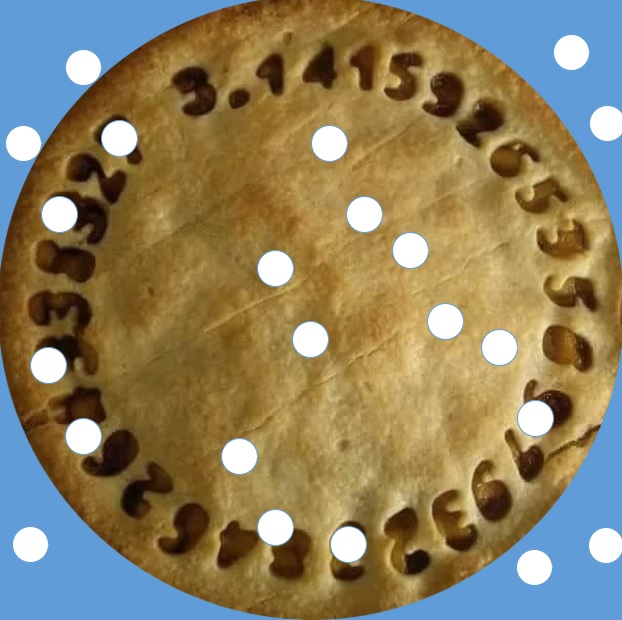
- Continue for as long as you care
- When you lose patience, count:
- N = total number of pebbles
- C = number of pebbles within circle
- Estimate 𝝅 as follows:

This will give us 𝝅 but the problem is that for accuracy we need many, many pebbles:-
7 digits: ~10^12 samples
8 digits: * 100

This calculation is a perfect candidate for a map/reduce job that can benefit from the OneCompute Platform execution environment.
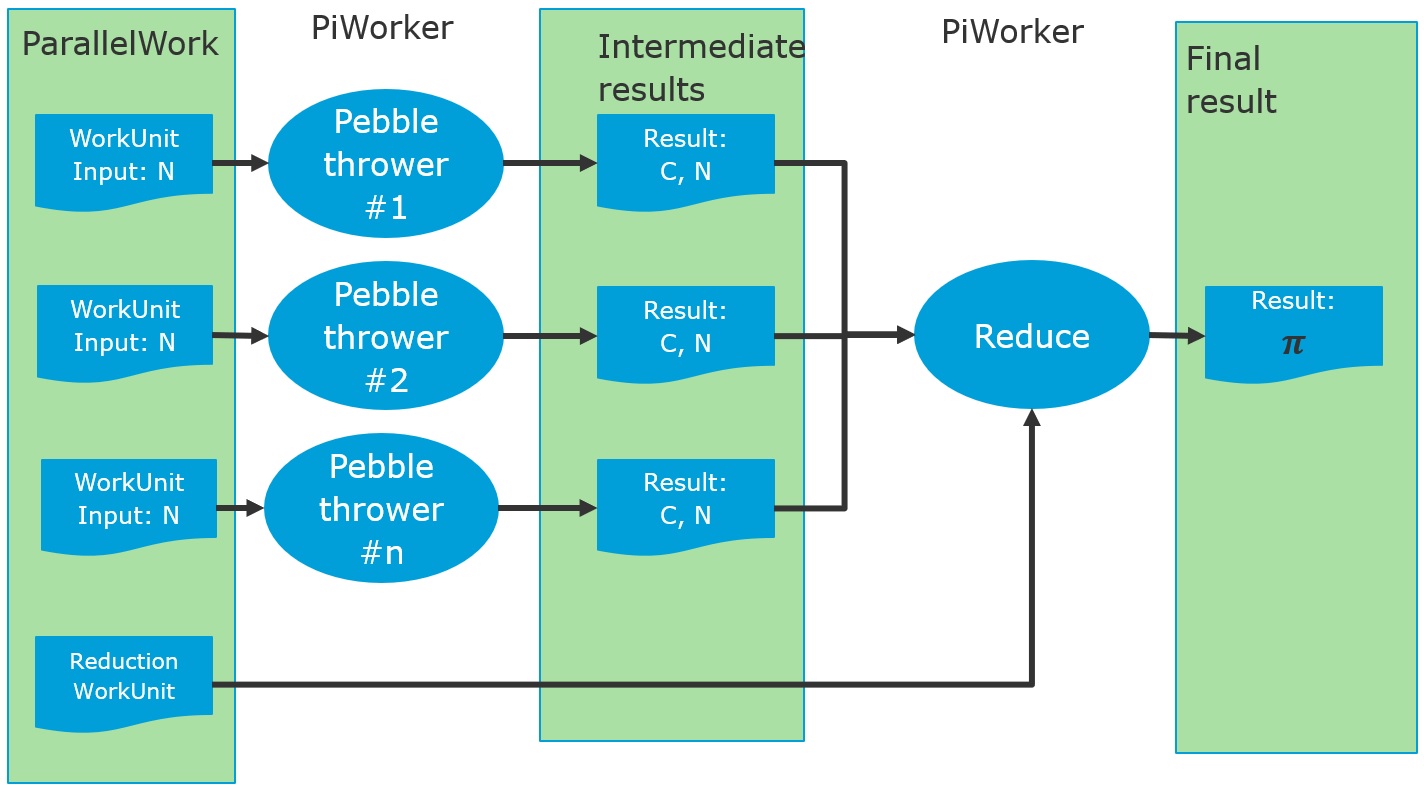
The technique is this:
- Create Job
- with n parallel work units
- and a reduction task
- Create PiWorker
- N random throws
- Counts C
- Reduction
- ∑𝝶
- Make the final estimate of 𝝅 from the intermediate results
Preparation
Create initial solution
This tutorial source code is held in the OneCompute examples repository... https://dev.azure.com/dnvgl-one/OneFoundation/_git/OneComputeExamples
We provide a batch file that can setup the initial solution:-
https://dev.azure.com/dnvgl-one/OneFoundation/_git/OneComputeExamples?path=%2Fsrc%2FPIEstimatorSample%2FCreateSolution.bat
dotnet new sln -o PiEstimator
cd PiEstimator

dotnet new console --target-framework-override net472 -o PiEstimator.Client
dotnet new classlib -o PiEstimator.ClientLibrary
dotnet new classlib -o PiEstimator.Common
dotnet new classlib --target-framework-override net462 -o PiEstimator.Worker

dotnet sln PiEstimator.sln add .\PiEstimator.Client\PiEstimator.Client.csproj .\PiEstimator.ClientLibrary\PiEstimator.ClientLibrary.csproj .\PiEstimator.Common\PiEstimator.Common.csproj .\PiEstimator.Worker\PiEstimator.Worker.csproj

dotnet add .\PiEstimator.Client\PiEstimator.Client.csproj reference .\PiEstimator.ClientLibrary\PiEstimator.ClientLibrary.csproj
dotnet add .\PiEstimator.Client\PiEstimator.Client.csproj package --no-restore DNV.One.Compute.Platform.Client -v 3.0.*
dotnet add .\PiEstimator.Client\PiEstimator.Client.csproj package --no-restore Microsoft.Identity.Client -v 4.8.2

dotnet add .\PiEstimator.ClientLibrary\PiEstimator.ClientLibrary.csproj reference .\PiEstimator.Common\PiEstimator.Common.csproj
dotnet add .\PiEstimator.ClientLibrary\PiEstimator.ClientLibrary.csproj package --no-restore DNV.One.Compute.Platform.Client -v 3.0.*

dotnet add .\PiEstimator.Worker\PiEstimator.Worker.csproj reference .\PiEstimator.Common\PiEstimator.Common.csproj
dotnet add .\PiEstimator.Worker\PiEstimator.Worker.csproj package --no-restore DNV.One.Compute.WorkerHost.AzureBatch -v 3.0.*
dotnet add .\PiEstimator.Worker\PiEstimator.Worker.csproj package --no-restore System.Composition.AttributedModel -v 1.3.0
If you download or create the batch file on your local machine and run it, it will use the dotnet cli to create the initial solution.
C:\repos>CreateSolution.bat

C:\repos>dotnet new sln -o PiEstimator
The template "Solution File" was created successfully.
....
....
....
C:\repos\PiEstimator>dotnet add .\PiEstimator.Worker\PiEstimator.Worker.csproj package --no-restore System.Composition.AttributedModel -v 1.3.0
info : Adding PackageReference for package 'System.Composition.AttributedModel' into project '.\PiEstimator.Worker\PiEstimator.Worker.csproj'.
warn : --no-restore|-n flag was used. No compatibility check will be done and the added package reference will be unconditional.
info : PackageReference for package 'System.Composition.AttributedModel' version '1.3.0' added to file 'C:\repos\PiEstimator\PiEstimator.Worker\PiEstimator.Worker.csproj'.
Review initial solution
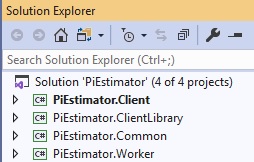
The generated solution consists of the following projects:-
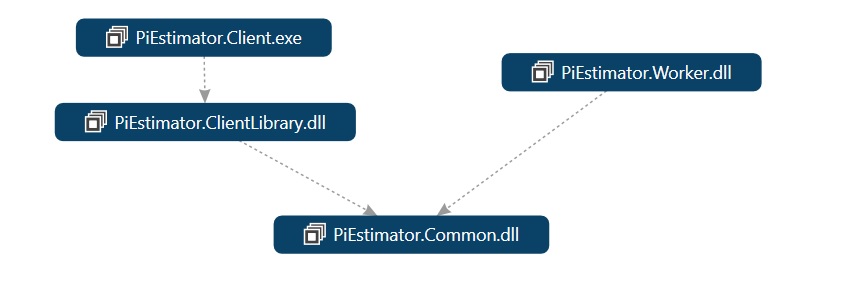
- PiEstimator.Client Console App (.NET 4.7.2 - so we can add integrated Veracity login)
- PiEstimator.ClientLibrary - .NET Standard 2.0 library with reference to DNV.One.Compute.Platform.Client NuGet package
- PiEstimator.Common - .NET Standard 2.0 library with no references
- PiEstimator.Worker - .NET 4.6.1 library with reference to DNV.One.Compute.WorkerHost.AzureBatch NuGet package
Develop the solution
We will now start to build up the solution components. Start by building the skeleton solution in Release configuration. This will restore the NuGet packages, providing references for any code that pasted into the solution. A Release configuration build is needed for the deployment step.
Common library - PiEstimator.Common
The common library is going to be referenced by both the client application & the worker library that runs on the OneCompute Platform Pool nodes. It will contain our DTO classes for input and result data. These will just be plain old CLR objects (POCO)s.
Open the PiEstimator.Common project in Visual Studio (or Visual Studio Code). If you want, feel free to delete the empty Class1 file.
PiEstimateInput class
Now add the following class:
public class PiEstimateInput
{
    public long NumberOfSamples { get; set; }
}
This is going to be used as the input to every work unit calculation run in parallel - ie. the number of throws to attempt within each parallel calculation.
PiEstimateIntermediateResult class
Next add the following class:
public class PiEstimateIntermediateResult
{
    public long NumberWithinUnitCircle { get; set; }
    public long NumberOfSamples { get; set; }
}
This will be used to store the result of each work unit and eventually all of them will be passed to the reduction step.
PiEstimateFinalResult class
Finally add this class:
public class PiEstimateFinalResult
{
    public long TotalNumberOfSamples { get; set; }
    public long TotalNumberWithinUnitCircle { get; set; }
    public double PI { get; set; }

    public double StandardDeviation { get; set; }
}
This will store the result of the reduction step and forms the final result of the job. It will be passed back to the client.
Worker Library - PiEstimator.Worker
The worker library is the wrapper for your actual executable workload. It is the code that will eventually be scheduled to execute on the OneCompute Platform Pool nodes.
Verify OneCompute package dependencies
The PiEstimator.Worker.csproj file should already have package references for:
- The DNV.One.Compute.WorkerHost.AzureBatch package: This brings in the OneCompute host executable that will call this worker library
- The System.Composition.AttributedModel: This gives us the ability to annotate our worker with the Export attribute
<PackageReference Include="DNV.One.Compute.WorkerHost.AzureBatch" Version="3.0.*" />
<PackageReference Include="System.Composition.AttributedModel" Version="1.3.0" />
Worker class
Add a class named Worker using the following snippet.
[Export(typeof(IWorker))]
public class Worker : WorkerBase, ISupportProgress, ISupportReduction
{
    [ImportingConstructor]
    public Worker()
    {
    }
}
It will require the following using statements
using System.Collections.Generic;
using System.Composition;
using System.Linq;
using System.Reflection;
using System.Threading.Tasks;
using DNV.One.Compute.Core.FlowModel;
using DNV.One.Compute.Core.Scheduling;
using DNV.One.Compute.Core.Worker;

using PiEstimator.Common;
This bases our class on the OneCompute WorkerBase class that provides common functionality for workers. It also adds the capability to support calling progress updates within the workload. And the ability to be run as a reducer workload as well.
Add the ExecuteAsync method
Next add an empty ExecuteAsync method. This will hold our actual workload code.
public override async Task<object> ExecuteAsync(IWorkerExecutionStatusNotificationService workerExecutionStatusNotificationService, IWorkUnit workUnit, IEnumerable<Result> dependencyResults)
{
}
Populate the ExecuteAsync method
Add the following code snippets to the ExecuteAsync method
Step 1. Get the workload input data
var inputData = workUnit.GetInput<PiEstimateInput>();
var numberOfSamples = inputData.NumberOfSamples;
Step 2. Create a random number generator
var random = new Random(workUnit.GetHashCode());
Step 3. Do the sampling
var numberWithinUnitCircle = 0;
for (var iteration = 0; iteration < numberOfSamples; iteration++)
{
    var x = (random.NextDouble() * 2.0) - 1.0;
    var y = (random.NextDouble() * 2.0) - 1.0;
    var distance = Math.Pow(x, 2.0) + Math.Pow(y, 2.0);
    if (distance <= 1.0)
    {
        numberWithinUnitCircle++;
    }

    var progress = (double)iteration / numberOfSamples;
    workerExecutionStatusNotificationService?.AddWorkItemStatus(WorkStatus.Executing, progress, $"progress update {(int)progress * 100}%");
}
Step 4. Return the result
return new PiEstimateIntermediateResult
{
    NumberOfSamples = numberOfSamples,
    NumberWithinUnitCircle = numberWithinUnitCircle
};
Add the ReduceAsync method
Next add an empty ReduceAsync method. This will hold the code to execute the reduction step.
// Implements ISupportReduction
public async Task<object> ReduceAsync(IWorkerExecutionStatusNotificationService workerExecutionStatusNotificationService, IWorkUnit workUnit, IEnumerable<IResult> dependencyResults)
{
}
Populate the ReduceAsync method
Add the following code snippets to the ReduceAsync method
Step 1. Get hold of results of dependencies
var listResults = dependencyResults
        .Select(r => r.GetResult<PiEstimateIntermediateResult>())
        .Where(r => r != null).ToList();
Step 2. Aggregate the numbers
var totalNumberOfSamples = listResults.Sum(res => res.NumberOfSamples);
var totalNumberWithinUnitCircle = listResults.Sum(res => res.NumberWithinUnitCircle);
Step3. Estimate PI
var pi = 4.0 * totalNumberWithinUnitCircle / totalNumberOfSamples;
Step 4. Estimate error, using method from standard population statistics
const double Z = 1.96; // 95% confidence
var p = pi / 4;
var standardDeviation = Z * Math.Sqrt(p * (1 - p) / totalNumberOfSamples);
Step 5. Return the final result
return new PiEstimateFinalResult
{
    PI = pi,
    TotalNumberOfSamples = totalNumberOfSamples,
    TotalNumberWithinUnitCircle = totalNumberWithinUnitCircle,
    StandardDeviation = standardDeviation
};
Build and package the Worker as an Application Package
Now build the PiEstimator.Worker project.

In order to deploy this worker to the OneCompute Platform we need to wrap it and its dependencies up in a zip file. In Azure Batch terminology this is called an Application Package. We have a powershell script that can perform this task for you.. https://dev.azure.com/dnvgl-one/OneFoundation/_git/OneComputeExamples?path=%2Fsrc%2FPIEstimatorSample%2FPiEstimator.Worker%2FCreateApplicationPackage.ps1
Download this script to your PiEstimator.Worker project folder.

And execute it:
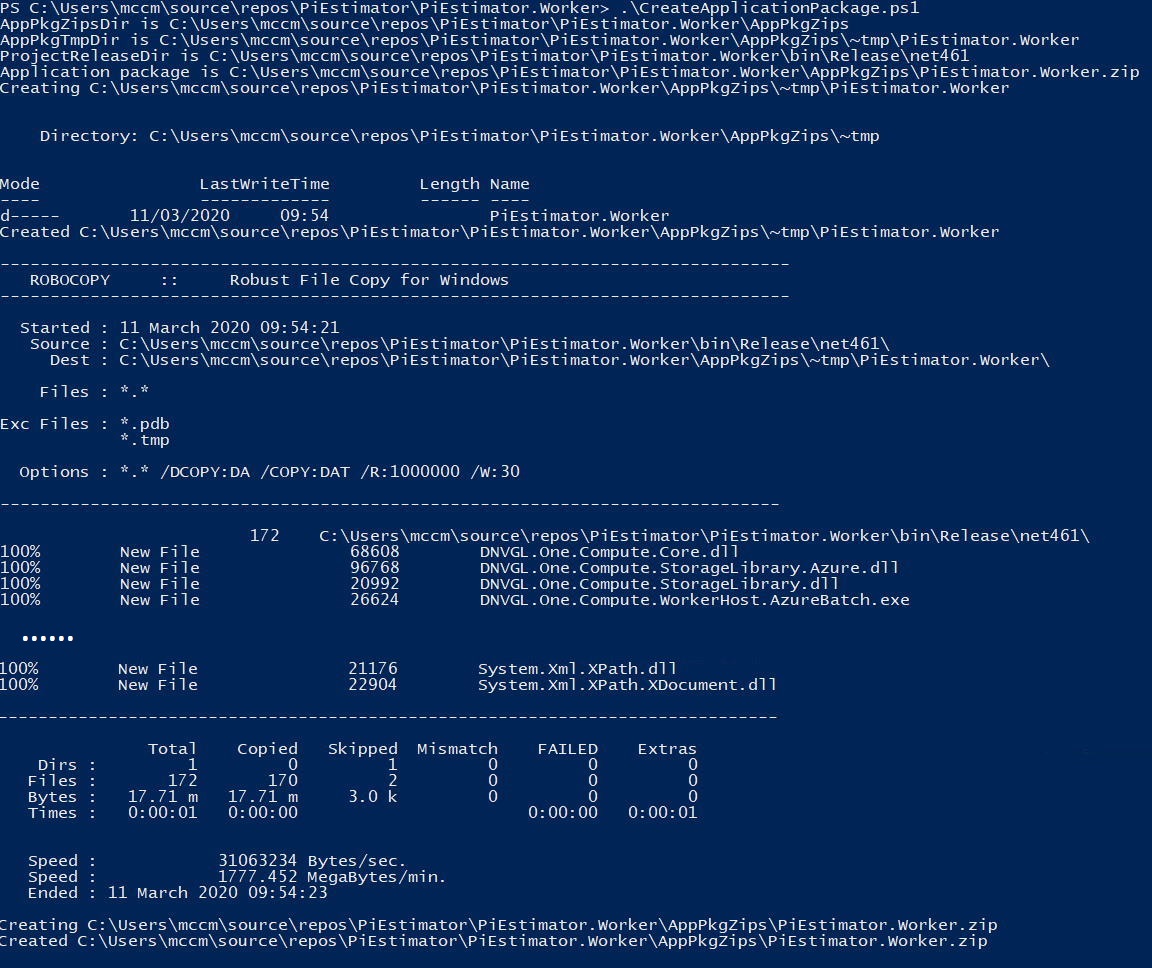
We now have our application package zip file PiEstimator.Worker.zip generated in the AppPkgZips folder.

Deploy the PiEstimator to the OneCompute Platform
The next stage is for us to deploy the application package into our OneCompute Platform environment.
When you login to the OneCompute Platform portal you should be able to see the Applications tab. If you don't then please contact your local OneCompute representative to grant you the Application Owner role.
The Applications tab lists all the applications that have been registered with this OneCompute Platform environment and it is here where you manage existing applications and register new ones.

When you click the Create Application button you are presented with a form in which you can enter the:
- An application/service name - this is will be used later in your client side code to identity the target service
- Display name - use this for a more descriptive name that will not be used for id purposes.
- Default Pool - you can select the operational pool that will be used by default if no pool is specified on job scheduling.
- Cost factor - a factor allowing you to specify relative value to different applications/services in your suite.
We will add an application named PiCalcTutorial. Please use this name for your application and select an appropriate Windows pool from your OneCompute Platform environment.
Warning
It is possible that some other user has followed this tutorial in your OneCompute Platform environment and has already created an application named PiCalcTutorial. You will not be able to create a new applicationn with the same name because OneCompute Platform requires unique service naming. And you will not be able to use this existing application because you will not have permission to use it. In this situation, please use an alternative name for your application and use that name instead in the rest of the tutorial.
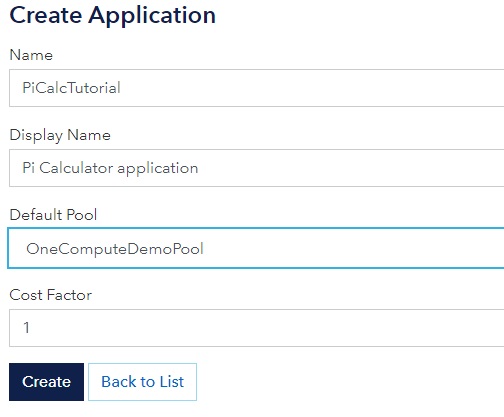
After clicking Create we can now see the application listed. Use the action menu to enter the details panel.

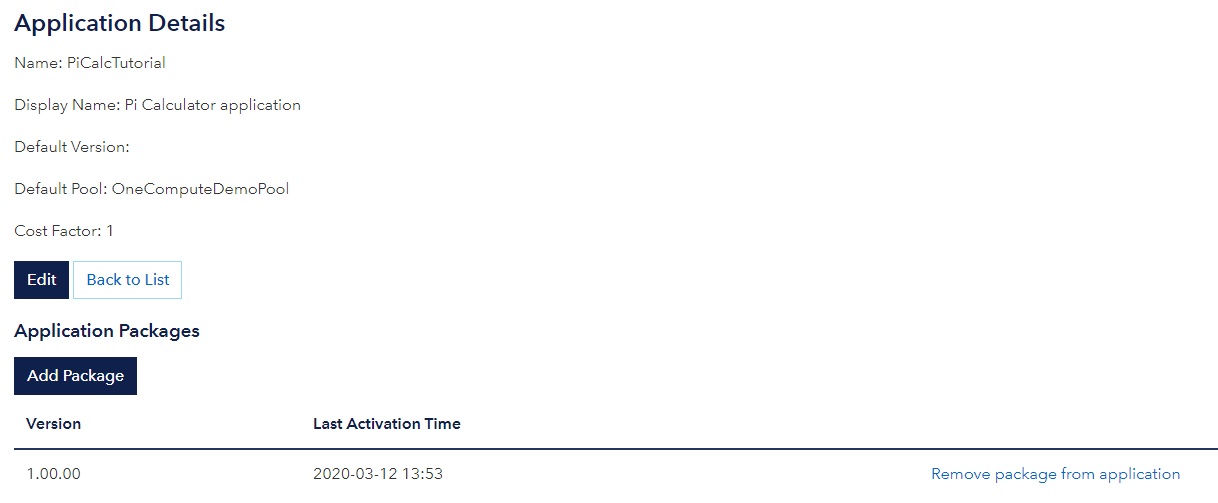
The details panel is where we are able to add/remove different application packages versions for the application.
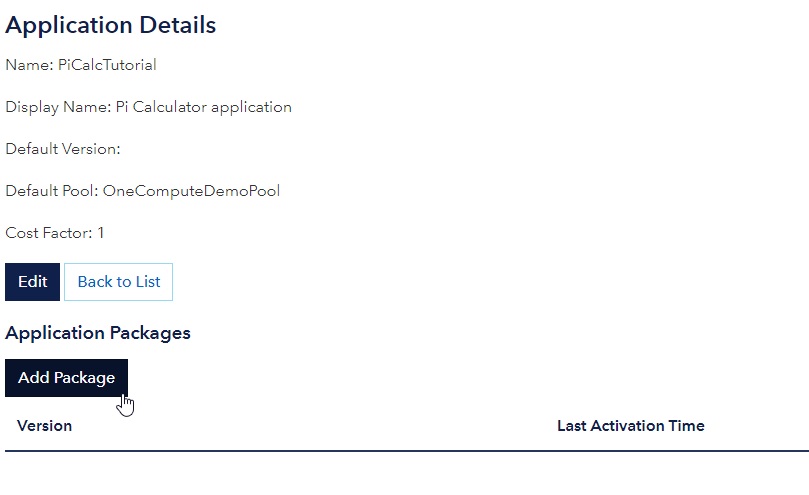
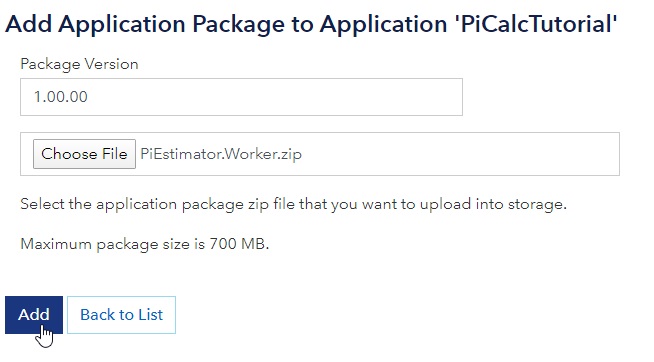
Clicking Add Package brings up the Add Application Package form. Here we specify the version we want to assign to this package and click Choose File to browse for it.
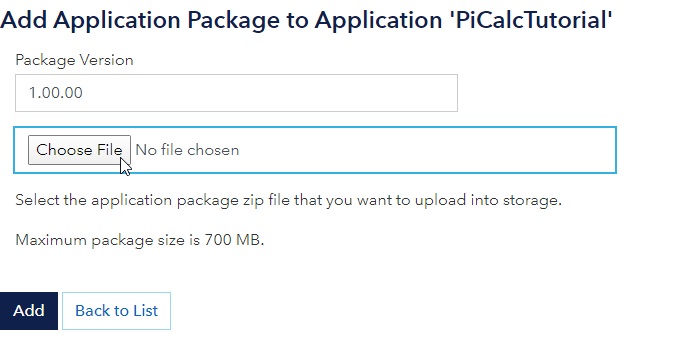
Browse to the PiEstimator.Worker.zip we created earlier and select it.
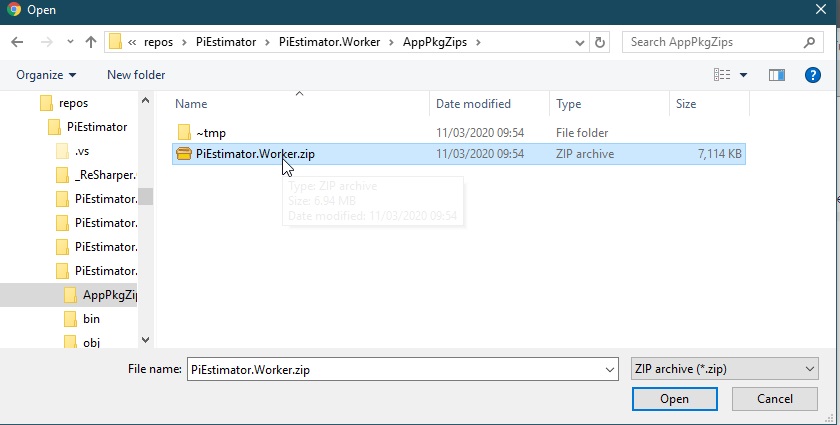
We can now see it listed in the file input box. Click Add.
And now we can see this package registered in the details form.
Lastly we want to specify the default version of the application package to use for this application if none other is specified. We do this by clicking the edit button.
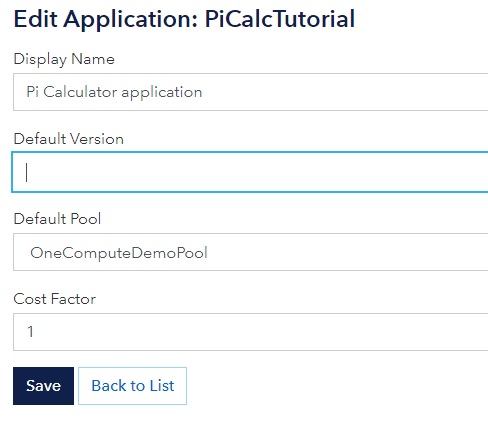
Earlier we added our package with a specified version of 1.00.00. It is currently our only version but enter 1.00.00 as the default version anyway.
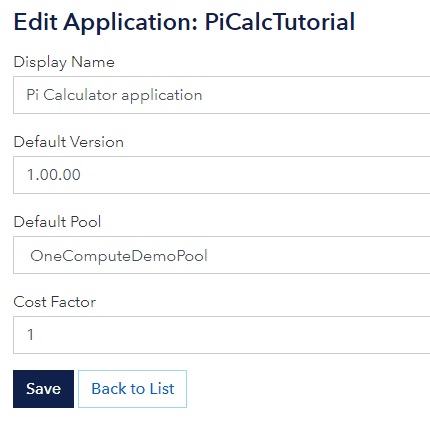
Our application is now defined with a name of PiCalcTutorial, a default version of 1.00.00 and a default pool.

We have everything in place now on the server side so lets deal with writing our client application now.
Client Library - PiEstimator.ClientLibrary
We are going to create our real OneCompute based client side interactions in the PiEstimator.ClientLibrary. It is a .NET Standard 2.0 library and will reference the DNV.One.Compute.Platform.Client NuGet package.
Verify OneCompute package dependencies
The PiEstimator.ClientLibrary.csproj file should already have package references for:
- The DNV.One.Compute.Platform.Client package: .NET Client library for the OneCompute Platform REST API
<PackageReference Include="DNV.One.Compute.Platform.Client" Version="3.0.*" />
PiSampler class
Add a class named PiSampler using the following snippet
public static class PiSampler {
}
It will require the following using statements:
using System;
using System.Collections.Generic;
using System.Threading.Tasks;

using DNV.One.Compute.Core.FlowModel;
using DNV.One.Compute.Core.Scheduling;
using DNV.One.Compute.Platform.Client;

using PiEstimator.Common;
Add some parameters
Define some constants. The ApiUrl will need to be adjusted to target the appropriate OneCompute Platform environment.
const long NumSamplesPerWorkUnit = 10_000_000;
const long NumWorkUnits = 100;
const string ApiUrl = "https://develop.onecompute.dnv.com/api";
Add the Run method
We need a method to construct and execute our job - call it Run.
public static async Task Run(string accessToken)
{
}
Create a OneCompute Platform REST API client
var oneComputePlatformClient = new OneComputePlatformClient(ApiUrl, accessToken);
Create work items
var workItems = new List<WorkItem>();
for (var parallelTask = 0; parallelTask < NumWorkUnits; parallelTask++)
{
    workItems.Add(new WorkUnit(new PiEstimateInput()
    {
        NumberOfSamples = NumSamplesPerWorkUnit
    }));
}

var reductionWorkUnit = new WorkUnit();

var work = new ParallelWork
{
    WorkItems = workItems,
    ReductionTask = reductionWorkUnit
};
Create Job
Note the user of the application package name we used as an id when adding the package to the platform. This needs to match exactly.
Also note we are telling the job which pool we want to run on. You will need to set this according to what pool supports your app in your OneCompute Platform environment.
const string appPackageName = "PiCalcTutorial";
var job = new Job
{
    ServiceName = appPackageName,
    Work = work,
    PoolId = "OneComputePlatformDemoPool"
};

// When running on a pool that does not have PiCalc pre-deployed, a DeploymentModel must be set that specifies that the PiCalc application
// must be deployed for the job.
// These 3 lines can potentially be commented out.
var deploymentModel = new DeploymentModel();
deploymentModel.AddApplicationPackage(appPackageName);
job.DeploymentModel = deploymentModel;
Submit the job and obtain monitor
We submit the job object for scheduling and the platform returns a job monitor object to keep track of the progress of the job.
// Submit the job and obtain the job monitor
var monitor = await oneComputePlatformClient.SubmitJobAsync(job);
Set up callbacks on the job monitor
We now add callbacks on the job monitor to handle status & progress events.
// Set up callbacks on the job monitor to handle status and progress events.
monitor.JobStatusChanged += JobStatusChanged;
monitor.JobProgressChanged += JobProgressChanged;
await monitor.AwaitTerminationAsync(job.JobId);

// TODO - Job Status changed event handler

// TODO - Job progress changed events handler
Add local callback handler for job progress update events
Insert the following local method where we have the comment // TODO - Job progress changed events handler
This will simply write out to the console the current progress of the job and any progress messages received from our job.
void JobProgressChanged(object sender, JobEventArgs jobEvent)
{
    var currentProgress = jobEvent.Progress * 100;
    var message = jobEvent.Message;

    Console.WriteLine($"JobProgressChanged => currentProgress={currentProgress}   {message}");
}
Add local callback handler for job status changed events
Insert the following local method where we have the comment // TODO - Job Status changed event handler
Whenever the job progress between states the JobStatusChanged event will be fired. We can use this to capture when faults occur or when the job completes.
void JobStatusChanged(object sender, JobEventArgs jobEvent)
{
    try
    {
        var jobStatusFlag = jobEvent.WorkStatus;
        var message = jobEvent.Message;
        switch (jobStatusFlag)
        {
            case WorkStatus.Faulted:
                message = $"Cloud job {job.JobId} faulted. Details: {message}";
                Console.WriteLine($"{message}{Environment.NewLine}");
                break;
            case WorkStatus.Aborted:
                Console.WriteLine($"Aborted{Environment.NewLine}");
                break;
            case WorkStatus.Completed:
                Console.WriteLine($"JobStatusChanged - Completed!{Environment.NewLine}");
                Console.WriteLine($"Retrieving results...{Environment.NewLine}");

                // TODO - Retrieve results

                break;
            default:
                return;
        }


        // TODO - Job has terminated - get compute duration
    }
    catch (Exception ex)
    {
        Console.WriteLine(ex.Message + ex.StackTrace);
    }
}
Results retrieval
In the event of a successful run we want to obtain the result from the platform.
Insert the following code where we have added the comment // TODO - Retrieve results.
This will use the platform client to request the result from our reduction step - which is of course 𝝅.
var finalResultItem = oneComputePlatformClient.GetWorkItemResult(job.JobId, reductionWorkUnit.Id);
if (finalResultItem != null)
{
    var finalResult = finalResultItem.GetResult<PiEstimateFinalResult>();
    Console.WriteLine("FINAL RESULT");
    Console.WriteLine($"PI = {finalResult.PI}");
    Console.WriteLine($"Std. dev. = {finalResult.StandardDeviation:E1}");
    Console.WriteLine($"Number of samples = {finalResult.TotalNumberOfSamples}");
    Console.WriteLine($"Number within unit circle = {finalResult.TotalNumberWithinUnitCircle}");
}
Output compute duration
Finally add the following snippet where we have the comment // TODO - Job has terminated - get compute duration.
This will retrieve the final status of the job which includes both the completion time and the total compute seconds of the job.
// The job has now terminated - successfully or otherwise. Obtain the status record and write out the compute duration
var jobStatusInfo = oneComputePlatformClient.GetJobStatus(job.JobId);
if (jobStatusInfo != null)
{
    Console.WriteLine($"Job completed at {jobStatusInfo.CompletionTime}{Environment.NewLine}");
    Console.WriteLine($"Job total compute time {jobStatusInfo.TotalComputeSeconds} seconds{Environment.NewLine}");
    Console.WriteLine("Press any key to exit...");
}
Client Console Application - PiEstimator.Client
Lastly we have the client console application. This is a .NET Framework console application. This is that we are able to perform interactive Veracity authentication on behalf of a user.
It is then responsible for creating a PiSampler instance and passing the access token to it.
Open Program.cs and add the following using statements:
using System;
using System.Threading.Tasks;

using Microsoft.Identity.Client;

using PiEstimator.ClientLibrary;
And edit the program class to be the code snippet shown below. You will need to plug in the AppId and ApiClientId received from the OneCompute team for your target OneCompute Platform environment.
public class Program
{
    public static async Task Main(string[] args)
    {
        var authenticationResult = await Authenticate();

        if (authenticationResult.AccessToken == null)
        {
            Console.WriteLine("Failed to authenticate. Press any key to exit.");
            Console.ReadKey();
            return;
        }

        await PiSampler.Run(authenticationResult.AccessToken);
    }

    /// <summary>Authenticate with the specified auth provider.</summary>
    /// <returns>Auth result</returns>
    private static async Task<AuthenticationResult> Authenticate()
    {
        Console.WriteLine("Authenticating....");
        var authConfig = (AppId: "TODO-Request Veracity GUID for application with scope to the required OneComputePlatformAPI",
                         ApiClientId: "TODO-Request Veracity GUID for required OneComputePlatformAPI",);

        return await LoginWithVeracityAsync(authConfig.AppId, authConfig.ApiClientId);
    }

    /// <summary>
    /// Login with Veracity
    /// </summary>
    /// <param name="appClientId">The application client identifier.</param>
    /// <param name="apiClientId">The API client identifier.</param>
    /// <returns>
    /// Returns a Task
    /// </returns>
    private static async Task<AuthenticationResult> LoginWithVeracityAsync(string appClientId, string apiClientId)
    {
        try
        {
            // Active Directory Tenant where app is registered
            const string Tenant = "dnvglb2cprod.onmicrosoft.com";

            // Policy for authentication
            const string PolicySignUpSignIn = "B2C_1A_SignInWithADFSIdp";

            // List of scopes for tenant
            // openid and offline_access added by default, no need to repeat
            string[] apiScopes =
            {
                $"https://dnvglb2cprod.onmicrosoft.com/{apiClientId}/user_impersonation"
            };

            // Url where authentication will take place.
            var authority = $"https://login.microsoftonline.com/tfp/{Tenant}/{PolicySignUpSignIn}/oauth2/v2.0/authorize";

            // Tries to connect to Authority with given Scopes and Policies.
            // Results with separate dialog where user needs to specify credentials.
            var clientApplication = PublicClientApplicationBuilder.Create(appClientId)
                .WithB2CAuthority(authority)
                .Build();

            return await clientApplication.AcquireTokenInteractive(apiScopes)
                             .WithUseEmbeddedWebView(true)
                             .ExecuteAsync();
        }
        catch (Exception ex)
        {
            var errorMsg = $"Error...{Environment.NewLine}{ex.Message}{Environment.NewLine}";
            Console.WriteLine(errorMsg);
        }

        return null;
    }
}
Run the solution
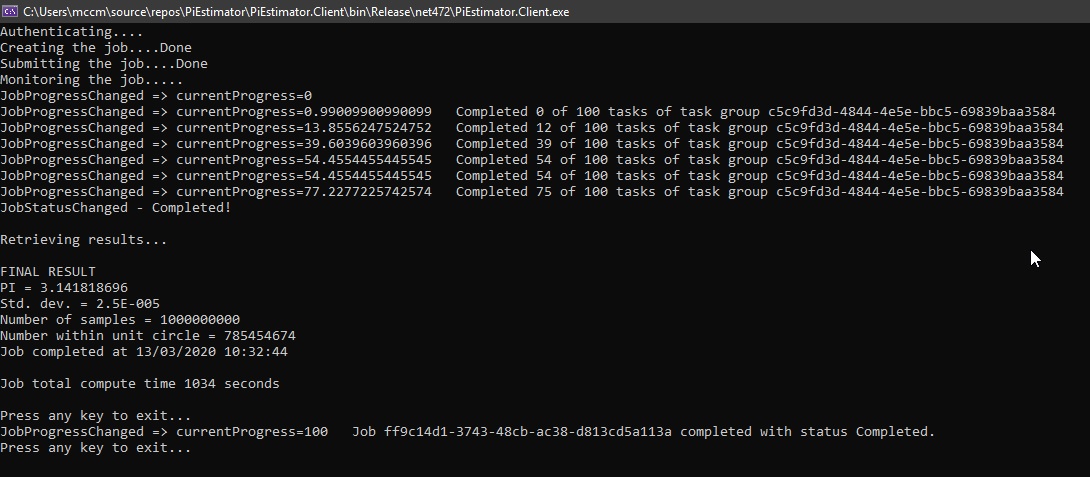
And finally we get to run our solution. Below you can see the console output from a run and the result of the calculation - 𝝅!
Cleaning Up
Note
As a courtesy to other user's who might follow this tutorial we would ask that you delete your application from the portal when you no longer require it. OneCompute Platform requires unique naming for every application. This means that subsequent user's following this tutorial cannot create the PiCalcTutorial service because one already exists. Thank you!
Warning
Please remember to scale down any pools you are using or delete pools you have created for this tutorial if you no longer require them. Microsoft charge for every node that is running in a pool whether you are executing compute jobs on it or not. This is essential to avoid unnecessary charges to DNV.