Security
In order to connect to cloud services through their APIs credentials are needed. This document describes the various ways which OneCompute supports the handling of these credentials and in addition some of the methods of securing your compute resources through Azure.
The services which require credentials are Azure Storage & Azure Batch.
Using Shared Key Credentials (Simplest Method)
Azure Storage
If using Azure Storage, OneCompute will use the Azure Storage API to communicate with the data tables. In order to do this, it must authenticate first using a connection string. The simplest way of authenticating against Azure Storage is using Shared Key Credentials. You can obtain your storage account name & key from the Keys blade in Azure as shown below.

OneCompute provides some classes to assist you in configuring the authenticated storage connection that will be used by the client and server libraries.
Using the storage account name and key that you obtained from the Keys blade of the portal, you can use the code below to produce the required connection string.
var storageAccountName = "<enter your storage account name here>";
var storageAccountKey = "<enter your storage account key here>";

var azureStorageConnectionStringResolver = new AzureStorageConnectionStringResolver();
azureStorageConnectionStringResolver.SetStorageAccountNameAndAccessKey(storageAccountName, storageAccountKey);
var storageConnectionString = azureStorageConnectionStringResolver.ResolveStorageConnectionString();
Azure Batch
If using the Azure Batch service, then the OneCompute libraries will need to authenticate with the Azure Batch API. The simplest approach is using shared key credentials. You obtain your batch credentials from the Azure Batch Service blade of the Azure Portal. Navigate to your Azure Batch resource and then click on the Keys blade.
 Azure Batch Service Credentials
The code to specify the credentials looks like this. Just plug in the values for the 3 fields that you pulled from the portal.
# Client Application Code Block:

var batchAccountKey = "<enter value copied from Primary Access Key field>";
var batchAccountName = "<enter value copied from Batch Account field>";
var batchAccountUrl = "<enter value copied from URL field>";

var batchCredentials = BatchCredentials.ConfigureBatchAccountAccessKeyCredentials(
                    batchAccountKey,
                    batchAccountName,
                    batchAccountUrl);
Using Azure AD Credentials (Advanced)
If you want to have more control over the access rights of users to the storage and batch services then you can make use of Azure AD. This is quite an involved process and we recommend reading the Microsoft documentation around this area.
When using Azure AD authentication with Azure Batch, you can authenticate in one of two ways:
- By using integrated authentication to authenticate a user that is interacting with the application. An application using integrated authentication gathers a user's credentials and uses those credentials to authenticate access to Batch resources.
- By using a service principal to authenticate an unattended application. A service principal defines the policy and permissions for an application in order to represent the application when accessing resources at runtime.
If you want your client application to be able to use Azure AD as the authentication mechanism for the batch service then you need to register the client application with the Azure AD tenant.
Within the Azure portal, open the Azure Active Directory blade for the tenant you want to use.
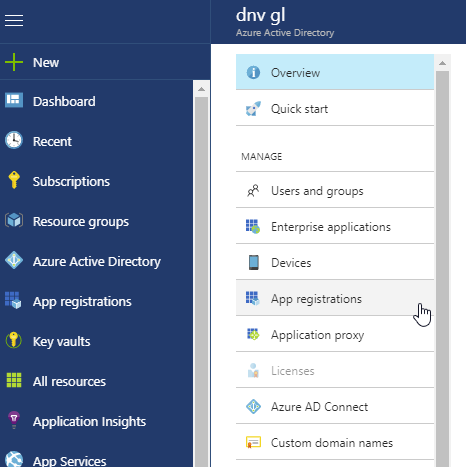
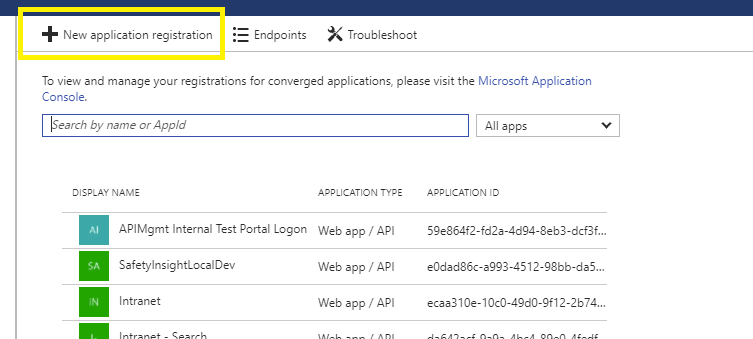
Then click New application registration.
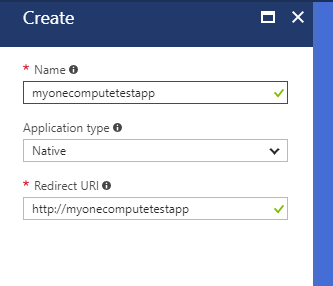
You then fill in the registration details.
Give your application a name and then specify its type. If you are writing a desktop or mobile client, select Native. The OAuth protocol requires you to specify a Redirect URI. This is still required for a native app - but it is a URI - it doesn't need to be a real endpoint. So, mostly you can just put http:// in front of the app name. However, please note the Redirect URI for use later.
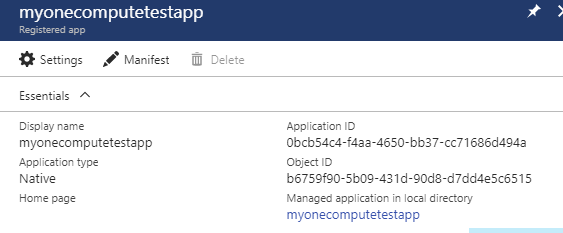
When the registration has completed, open the registration. Make a copy of the Application ID GUID. This is GUID is needed later and is referred to as either the Client ID or Application ID.
Using Azure AD Integrated Authentication
We must now grant our registered app permissions to access the Batch Service API.
Expand the Requested Permissions blade and click Add.
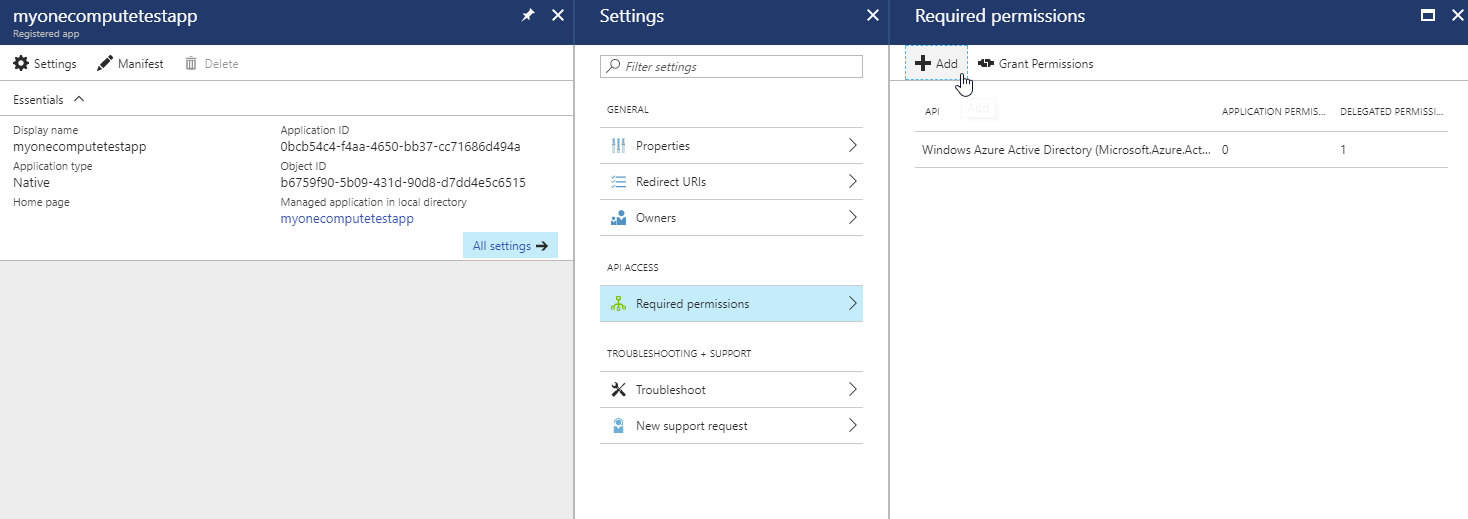
Search for Microsoft Azure Batch and select it.

Then tick the checkbox to allow the Access Azure Batch Service permission.

So your client application now has permissions to access the Azure Batch API through your Azure AD tenant. However, your client application will require manual authentication when you run it - so this is not suitable for unattended applications.
You would use the code below in your client application, plugging in the various values you have saved above.
# Client Application Code Block:

// Configures the Azure AD integrated authentication credentials.
// This will require the user who is registered on the tenant to authenticate.
var azureADTenantId = "<The Azure AD Tenant identifier>";
var azureADClientId = "<The Azure AD client identifier>";
var azureADRedirectUri = "<The Azure AD client redirect uri>";
var batchAccountUrl = "<enter value copied from Batch Account URL field>";

var batchCredentials = BatchCredentials.ConfigureAzureADIntegratedAuthenticationCredentials(
                    azureADTenantId,
                    azureADClientId,
                    azureADRedirectUri,
                    batchConfigModel.BatchAccountUrl);
Using Azure AD Service Principal Authentication
If you don't want to have to manually authenticate every-time you run your application or you have an unattended application then you can use a service principal. This means we need to add application credentials. We do this by adding a client secret key to our app registration. When our application authenticates with a service principal, it sends both the application/client ID and the client secret key to Azure AD.
To add a client secret key you,
- Click the Keys section on the Settings page.
- Add a description for your key.
- Select either a one or two year duration.
- Click Save. The right-most column will contain the key value, after you save the configuration changes. Be sure to copy the key for use in your client application code, as it is not accessible once you leave this page.
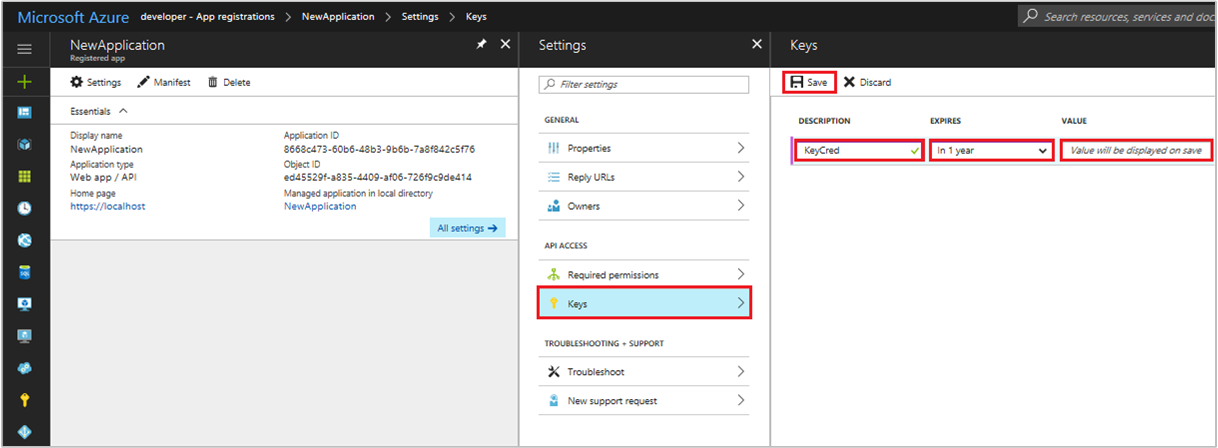
Lastly, we must grant our client application access rights to our Batch Account.
- Open your batch account in the portal.
- Click on Access Control (IAM).
- Click Add to open the Add Permissions blade.
- Select role of Contributor.
- Assign access to of Azure AD, user, group or application.
- Enter the name of your client app registration in the tenant.
- Select it and click Save.

Here is the code that you would use to connect to Azure Batch from your client App using the Azure AD service principal credentials. The main difference from the integration authentication approach is that you also pass the client secret key.
# Client Application Code Block:

// Configures the Azure AD service principal credentials.
// This means the client app must be registered as a service principal in the tenant.
var azureADTenantId = "<The Azure AD Tenant identifier>";
var azureADClientId = "<The Azure AD client identifier>";
var azureADClientSecret = "<The Azure AD client secret>";
var azureADRedirectUri = "<The Azure AD client redirect uri>";
var batchAccountUrl = "<enter value copied from Batch Account URL field>";

var batchCredentials = BatchCredentials.ConfigureAzureADServicePrincipalCredentials(
                    azureADTenantId,
                    azureADClientId,
                    azureADClientSecret,
                    azureADRedirectUri,
                    batchConfigModel.BatchAccountUrl);
Storing Storage Connection Strings in Azure Key Vault
To secure your Azure Storage account connection string you can use Azure Key Vault. This is a more advanced method and requires more complex configuration in the portal.
First of all, you need to create a Key Vault resource in the portal.
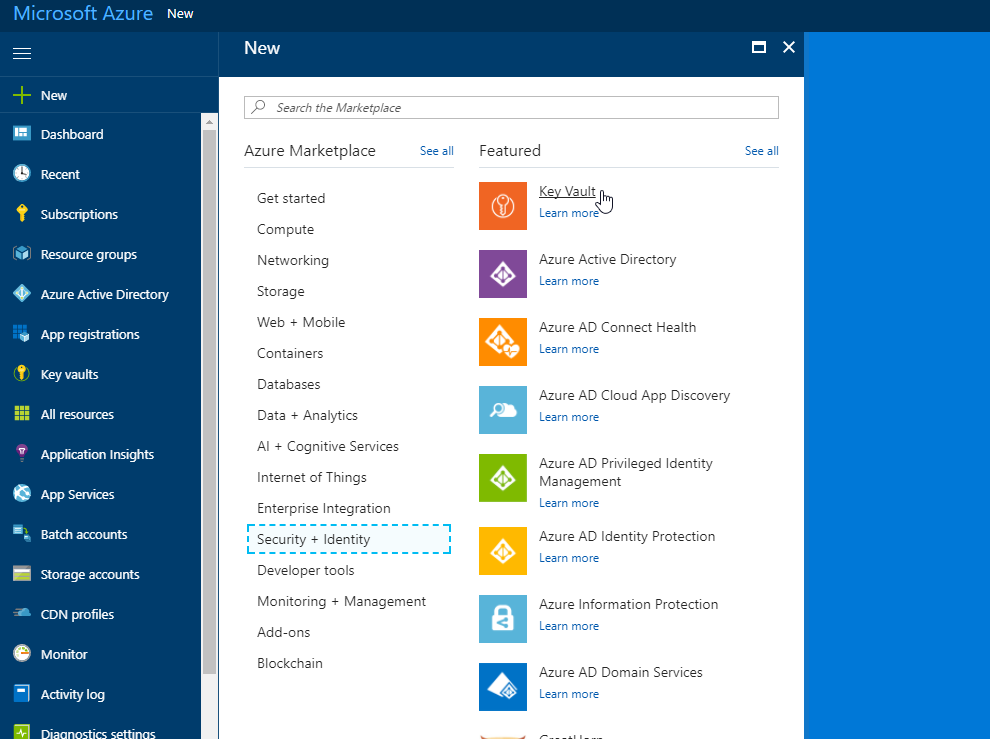
You will then be presented with the Create key vault blade. Select a location for the resource to be in a region geographically close to yourself (or the other resources you want to interface with).
If you have an Azure AD Service Principal defined for your client application you can add this under the Access Policies section.
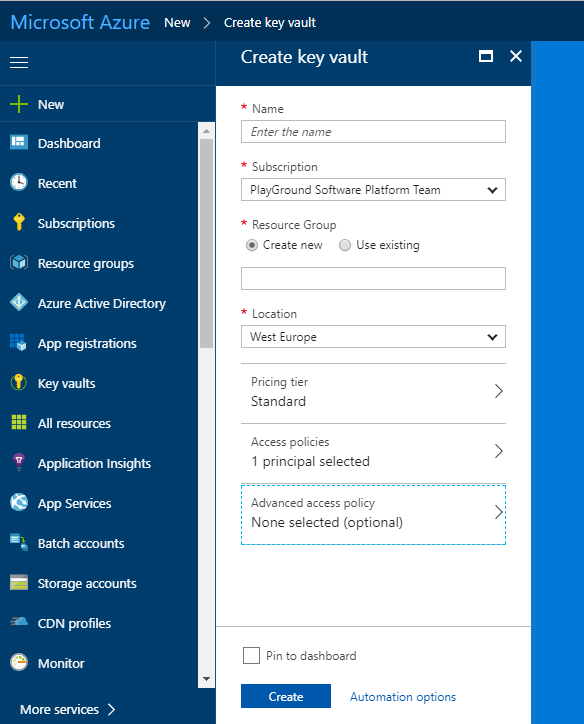
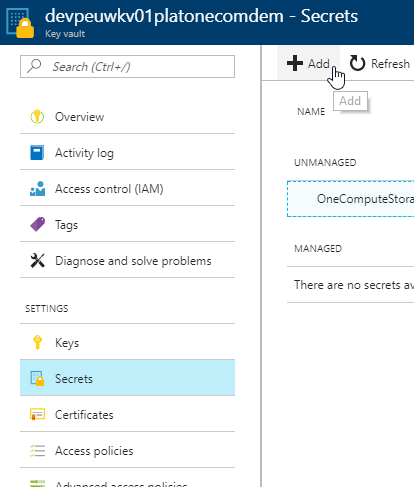
Next you select Secrets and click Add.
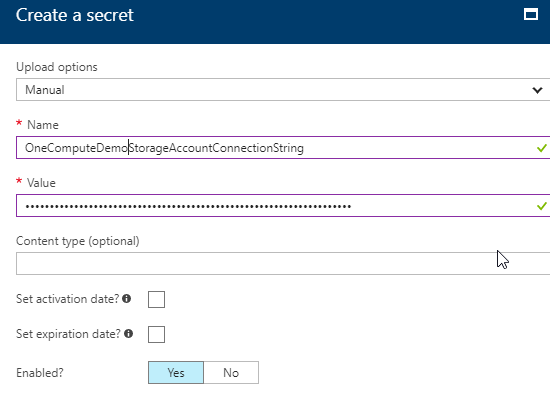
In the Create a secret blade you:-
- Set Upload options to Manual.
- Enter a secret name of your choosing.
- Set value to your storage account connection string.
- You can optionally set the lifetime of the secret by activation and expiration date.
- Save it.

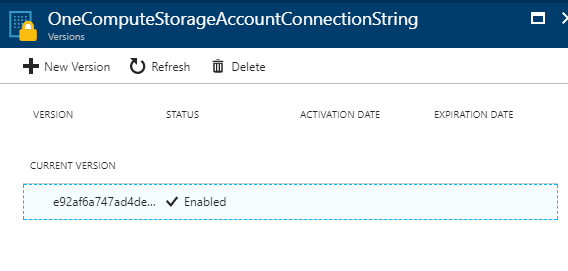
Click on the secret to open it.
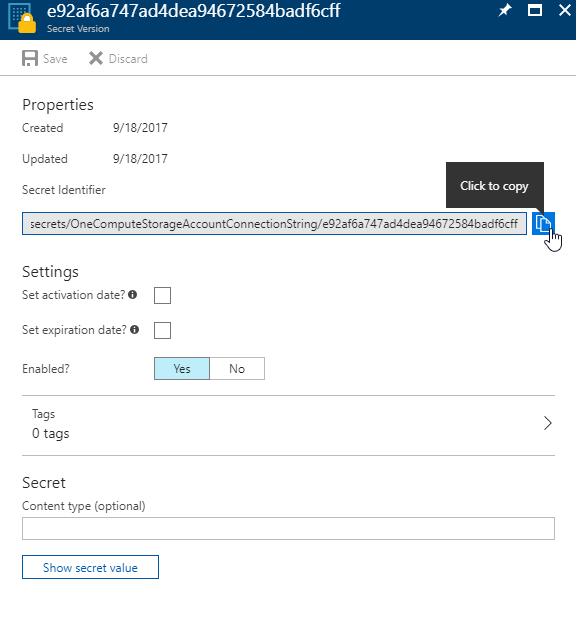
And click on the copy button the secret identifier the clipboard as you will use this in the code.
The code below demonstrates how you would obtain the connection string using this method.
var secretUri = "<enter your azure key vault uri to the storage connection string secret>";
var azureADClientId = "<enter your Azure AD client Id>";
var azureADClientSecret = "<enter your Azure AD client secret";

var azureStorageConnectionStringResolver = new AzureStorageConnectionStringResolver();
azureStorageConnectionStringResolver.SetKeyVaultCredentialsByClientSecret(secretUri, azureADClientId, azureADClientSecret);
var storageConnectionString = azureStorageConnectionStringResolver.ResolveStorageConnectionString();
Azure AD/Key Vault Configuration using Powershell
In Azure, pretty much everything you can do in the portal, can be done via scripting. Even then you have a number of choices such as Azure CLI 2.0 (cross platform) & Azure Powershell (windows only).
At the time of writing (November 2017) we found that only Azure Powershell cmdlets supported the Azure AD & Azure Key Vault control we required.
Here is some sample Powershell script that may be of use to you in:-
- Registering a client application with Azure AD.
- Creating an Azure Key Vault.
- Adding a storage connection string as a secret to the key vault.
- Granting access to the key vault secrets to the client application service principal.
#### CONNECT TO AZURE AD
# In order to use the Powershell Azure AD calls you need the Azure AD module.
# This call will install it if you have don't have it.
Install-Module AzureAD

# Connect to an authenticated account to use for calls to the Azure
# Active Directory cmdlets.
# A dialog will prompt you for your credentials
Connect-AzureAD

#### CONNECT TO AZURE POWERSHELL
# Authenticate with Azure Powershell so we can use the Resource Manager cmdlets.
# A dialog will prompt you for your credentials
# https://docs.microsoft.com/en-us/powershell/azure/install-azurerm-ps?view=azurermps-5.0.0
Login-AzureRmAccount

#### SELECT SUBSCRIPTION
# If you have more than one subscription, select the one you want to use..
Set-AzureRmContext -SubscriptionName '<enter your subscription name>'

#### REGISTER CLIENT APP WITH AZURE AD TENANT
# Register our OneCompute client application with the Azure AD tenant of the current subscription
$AzureAD_ClientAppSecret = '<enter a secret/password: eg. shjkgsjht7883oyhRfavahdetFgaft71r56fsuty>'
$AzureAD_ClientAppDisplayName = '<enter your client app name: eg MyOneComputeClientApp>'
$AzureAD_RedirectID = 'http://myonecomputeclientapp'
$aadApp = New-AzureADApplication -DisplayName $AzureAD_ClientAppDisplayName -ReplyUrls $AzureAD_RedirectID -PublicClient $true
$objectId = $aadApp.ObjectId;
$appId = $aadApp.AppId;

# And create a password accessor for it.
New-AzureADApplicationPasswordCredential -ObjectId $objectId -CustomKeyIdentifier "ClientSecret" -Value $AzureAD_ClientAppSecret

# Add a service principal for our application
$aadServicePrincipal = New-AzureADServicePrincipal -AppId $appId

#### CREATE AZURE KEY VAULT
# Create resource group in subscription (if it doesn't already exist)
$location = "West Europe"
$resourceGroupName = '<specify a resource group name>'
$rg = Get-AzureRMResourceGroup -Name $resourceGroupName
if (!$rg)
{
    $rg = New-AzureRmResourceGroup -Name $resourceGroupName -Location $location
}

# Create a key vault in subscription
$keyVaultName = '<specify a key vault name>'
$keyVault = Get-AzureRmKeyVault -ResourceGroupName $resourceGroupName -VaultName $keyVaultName
if (!$keyVault)
{
    $keyVault = New-AzureRmKeyVault -VaultName $keyVaultName -ResourceGroupName $resourceGroupName -Location $location
}

#### ADD STORAGE CONNECTION STRING SECRET TO KEY VAULT
# Add the storage account connection string as a secret
$storageAccountSecretName = 'OneComputeStorageAccountConnectionString'
$storageAccountConnectionString = '<enter your storage account connection string>'
$storageAccountSecureValue = ConvertTo-SecureString $storageAccountConnectionString -AsPlainText -Force
$kvSecret = Set-AzureKeyVaultSecret -VaultName $keyVaultName -Name $storageAccountSecretName -SecretValue $storageAccountSecureValue

#### GRANT CLIENT APP ACCESS TO OUR KEY VAULT SECRETS
# And grant it access to the key vault secrets.
Set-AzureRmKeyVaultAccessPolicy -VaultName $keyVaultName -ServicePrincipalName $appID -PermissionsToKeys all -PermissionsToSecrets all